Installing Mozc on Ubuntu
22 April 2011If you’re a Japanese speaker, one of the first things you do when you install a fresh Linux distribution is to install a decent Japanese IME. Ubuntu defaults to Anthy, but I personally prefer Mozc, and that’s what I’m going to show you how to install here.
Update (2011-05-01): Found an older video tutorial on YouTube which provides an alternative (and potentially more comprehensive) solution for Japanese support on 10.10 using ibus instead of uim, which is the better choice for newer releases.
Update (2011-10-25): The software installation part of this process got a whole lot easier in Ubuntu releases after Natty, and as noted above, I’d recommend sticking with ibus over uim.
Japanese Input Basics
Before we get going, let’s understand a bit about how Japanese input works on computers. Japanese comprises three main character sets: the two phonetic character sets, hiragana and katakana at 50 characters each, plus many thousands of Kanji, each with multiple readings. Clearly a full keyboard is impractical, so a mapping is required.
Input happens in two steps. First, you input the text phonetically, then you convert it to a mix of kanji and kana.

Over the years, two main mechanisms evolved to input kana. The first was common on old wapuro, and assigns a kana to each key on the keyboard—e.g. where the A key appears on a QWERTY keyboard, you’ll find a ち. This is how our grandparents hacked out articles for the local shinbun, but I suspect only a few die-hard traditionalists still do this. The second and more common method is literal transliteration of roman characters into kana. You type fujisan and out comes ふじさん.
Once the phonetic kana have been input, you execute a conversion step wherein the input is transformed into the appropriate mix of kanji and kana. Given the large number of homonyms in Japanese, this step often involves disambiguating your input by selecting the intended kanji. For example, the mita in eiga wo mita (I watched a movie) is properly rendered as 観た whereas the mita in kuruma wo mita (I saw a car) should be 見た, and in neither case is it mita as in the place name Mita-bashi (Mita bridge) which is written 三田.
Some Implementation Details
Let’s look at implementation. There are two main components used in inputting Japanese text:
The GUI system (e.g. ibus, uim) is responsible for:
- Maintaining and switching the current input mode: ローマ字、ひらがな、カタカナ、半額カタカナ.
- Transliteration of character input into kana: ku into く, nekko into ねっこ, xtu into っ.
- Managing the text under edit (the underlined stuff) and the drop-down list of transliterations.
- Ancillary functions such as supplying a GUI for custom dictionary management, kanji lookup by radical, etc.
The transliteration engine (e.g. Anthy, Mozc) is responsible for transforming a piece of input text, usually in kana form, into kanji: for example みる into one of: 見る、観る、診る、視る. This involves:
- Breaking the input phrase into components.
- Transforming each component into the appropriate best guess based on context and historical input.
- Supplying alternative transformations in case the best guess was incorrect.
Why Mozc?
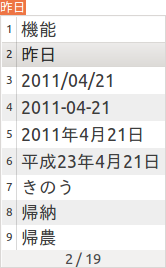
TL;DR: because it’s better. Have a look at the conversion list up at the top of this post. The input is kinou, for which there are two main conversion candidates: 機能 (feature) and 昨日 (yesterday). Notice however, that it also supplies several conversions for yesterday’s date in various formats, including 「平成23年4月21日」 using Japanese Era Name rather than the Western notation 2011. This is just one small improvement among dozens of clever tricks it performs. If you’re thinking this bears an uncanny resemblance to tricks that Google’s Japanese IME supports, you’re right: Mozc originated from the same codebase.
Switching to Mozc
So let’s assume you’re now convinced to abandon Anthy and switch to Mozc. You’ll need to make some changes. Here are the steps:
If you haven’t yet done so, install some Japanese fonts from either Software Centre or Synaptic. I’d recommend grabbing the ttf-takao package.
Next up, we’ll install and configure Mozc.
- Install ibus-mozc:
sudo apt-get install ibus-mozc - Restart the ibus daemon:
/usr/bin/ibus-daemon --xim -r -d - Set your input method to mozc:
- Open Keyboard Input Methods settings.
- Select the Input Method tab.
- From the Select an input method drop-down, select Japanese, then mozc from the sub-menu.
- Select Japanese - Anthy from the list, if it appears there, and click Remove.
- Optionally, remove Anthy from your system:
sudo apt-get autoremove anthy
Log out, and back in. You should see an input method menu in the menu bar at the top of the screen.
That’s it, Mozcを楽しんでください!